In the flourishing field of DIY light microscopy, a decision of choosing the programming language to control the microscope is critically important. Modern microscopes are becoming increasingly intelligent. They orchestrate multiple devices (lasers, cameras, shutters, pockel cells) with ever increasing temporal precision, collect data semi-automatically following user-defined scenarios, adjust focus and illumination to follow the motion (or development) of a living organism.
So, the programming language must seamlessly communicate with hardware, allow devices be easily added or removed, have rich libraries for device drivers and image processing, and allow coding of good-looking and smooth GUIs for end users. This is a long list of requirements! So, what are the options for DIY microscope programming?

There are currently two large schools of microscope programming - Labviewers and Micromanagers. (update: Matlab for microscope control also has a strong community, comparable to labviewiers and micromanagers.) Smaller camps of pythonians, C++/C-sharpers, and arduinists also thrive, but their favorite languages seem to be of less popularity.
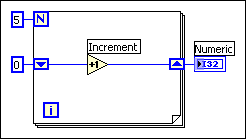
LabVIEW is a ecosystem of it's own and a distinct way of thinking. It was first released by National Instruments for Macintosh computers in 1986, which probably determined it's slick design and outlandish but visually appealing dataflow paradigm. Today it dominates the world of computers (mostly Windows) used in data acquisition, instrument control, and industrial automation. It's programs are written by connecting virtual instruments (VIs) with wires (data channels) in two-dimensional, multi-layer wiring diagrams. Virtual instruments start running when all their input wires receive the data, and pass new data over output wires to the next VIs. There is a universe of device drivers, libraries and functions which come with LabVIEW and allow to program almost any imaginable way of device control with nearly arbitrary timing precision. Beautiful GUIs are an essential part of LabVIEW program (front panel).
As an ecosystem, LabVIEW can seamlessly communicate with a rich variety of National Instruments hardware, such as multi-functional IO boards for programmable analog/digital input-output. It does not mean, of course, that you have to use NI's hardware - LabVIEW drivers are supplied by all major producers of cameras, lasers, and other microscopy devices. LabView can also communicate with Arduino (via USB port).
Like Macintosh computers, the beauty is pricey - LabVIEW Full development license is about $3000, but cheaper Base version is at $400/year as subscription.
It can also be painstaking to learn LabVIEW dataflow programming and build correct wiring diagrams, even for seasoned coders with experience in text-based languages. You don't write the code in LabVIEW - you select elements (virtual instruments), drop them into the wiring diagram, and connect with wires.
 Even a simple for() loop appears as a confusing frame, which can puzzle a person who used to program in C/C++. I first gave up learning LabVIEW, was traumatized for several years, and only after patiently taking online courses for two weeks, I finally started to code sensible programs without paralyzing panic "why doesn't it work again!". I now enjoy and appreciate LabVIEW, it became my favorite programming language.
The benefit of MM being free open-source software has a flip side - it is developed by enthusiasts sponsored by unstable money supply from grants - as the NIH funding terminated in 2015, MM depends on money from subscription plans.
MM has drivers for National Instruments multifunctional IO boards, but their functionality is currently minimal. This makes MM unable to generate, for example, analog output (AO) waveforms to control some popular devices like galvanometric mirrors (galvos).
 Galvos are computer-controlled turning mirrors for laser positioning - their angular motion is optically converted into translational motion of laser beam in focal plane. They take analog input voltage -10..+10 V as a position command, and can move to a new position within 1 millisecond. Galvos are essential components of some confocal and most two-photon and light-sheet microscopes.
It is possible to use the best functionality from both environments. Camera can be run from MM and configured to send digital trigger every time it takes an image. LabVIEW can run a program on National Instruments DAQ board, which listens to the digital trigger and generates AO waveforms after every trigger. These waveforms control galvo scanning and laser power in a tight synchrony with the camera. The LabVIEW program can be like this:


The upper portion of the wiring diagram defines the shapes of two waveforms, and the lower part starts AO generation task and configures it to be repeatedly triggered, until user presses Stop button on the front panel.
Did you know you can simply drag the png image of a code snippet into LabVIEW, and it will convert it into working code? Wild!
So, the program above listens to a digital trigger coming at a terminal named PFI0 of a National Instruments board PCIe-6321 (in my case), and after every trigger it generates two analog waveforms, a ramp and a square (ok, a trapezoid), at the output terminals ao0 and ao1, respectively. Like so:

This can occur less than 10 ms - camera sends a trigger, laser turns on, while the galvo mirror rotates and scans the laser - a useful sequence for generating a digitally scanned light sheet.
Download the LabView code
Keep your code simple, comment it, and share. Happy coding!
Update: There is also a significant community using Matlab, which was not mentioned in the original post. My apologies! Matlab provides interface for National Instruments IO boards and other hardware, and there is a popular software package ScanImage for microscope control, written exclusively in Matlab. My personal limited experience with Matlab for instrument control made this slip away from my attention.
So, the programming language must seamlessly communicate with hardware, allow devices be easily added or removed, have rich libraries for device drivers and image processing, and allow coding of good-looking and smooth GUIs for end users. This is a long list of requirements! So, what are the options for DIY microscope programming?

There are currently two large schools of microscope programming - Labviewers and Micromanagers. (update: Matlab for microscope control also has a strong community, comparable to labviewiers and micromanagers.) Smaller camps of pythonians, C++/C-sharpers, and arduinists also thrive, but their favorite languages seem to be of less popularity.
Labviewers
 |
| A wiring diagram in LabVIEW 1.0, ca 1986. |
As an ecosystem, LabVIEW can seamlessly communicate with a rich variety of National Instruments hardware, such as multi-functional IO boards for programmable analog/digital input-output. It does not mean, of course, that you have to use NI's hardware - LabVIEW drivers are supplied by all major producers of cameras, lasers, and other microscopy devices. LabView can also communicate with Arduino (via USB port).
Like Macintosh computers, the beauty is pricey - LabVIEW Full development license is about $3000, but cheaper Base version is at $400/year as subscription.
It can also be painstaking to learn LabVIEW dataflow programming and build correct wiring diagrams, even for seasoned coders with experience in text-based languages. You don't write the code in LabVIEW - you select elements (virtual instruments), drop them into the wiring diagram, and connect with wires.
Micromanagers
MicroManager is an open-source plugin for ImageJ, developed at UCSF since 2006 by a team of seasoned microscopists. As such, it is designed specifically to control DIY microscopes. MM is free, easy to use and program, and comes with a full power of ImageJ microscopy plugins. It includes device drivers from dozens of manufacturers - for cameras, lasers, shutters, etc. The GUI control is an easy start, but you can dive deeper into MM programming by writing Beanshell scripts and Java plugins, similar to programming ImageJ.The benefit of MM being free open-source software has a flip side - it is developed by enthusiasts sponsored by unstable money supply from grants - as the NIH funding terminated in 2015, MM depends on money from subscription plans.
MM has drivers for National Instruments multifunctional IO boards, but their functionality is currently minimal. This makes MM unable to generate, for example, analog output (AO) waveforms to control some popular devices like galvanometric mirrors (galvos).

Hybrid programming
The analog output (AO) waveform generation is easy in LabVIEW, but camera control and image processing are more user-friendly in MicroManager. How to choose between the two?It is possible to use the best functionality from both environments. Camera can be run from MM and configured to send digital trigger every time it takes an image. LabVIEW can run a program on National Instruments DAQ board, which listens to the digital trigger and generates AO waveforms after every trigger. These waveforms control galvo scanning and laser power in a tight synchrony with the camera. The LabVIEW program can be like this:


The upper portion of the wiring diagram defines the shapes of two waveforms, and the lower part starts AO generation task and configures it to be repeatedly triggered, until user presses Stop button on the front panel.
Did you know you can simply drag the png image of a code snippet into LabVIEW, and it will convert it into working code? Wild!
So, the program above listens to a digital trigger coming at a terminal named PFI0 of a National Instruments board PCIe-6321 (in my case), and after every trigger it generates two analog waveforms, a ramp and a square (ok, a trapezoid), at the output terminals ao0 and ao1, respectively. Like so:

This can occur less than 10 ms - camera sends a trigger, laser turns on, while the galvo mirror rotates and scans the laser - a useful sequence for generating a digitally scanned light sheet.
Download the LabView code
Which is 'better'?
Micromanager is easier for beginners and free. If you want to start quick - use MM. If at some point you need more growth - consider LabVIEW for some heavy-lifting, such as analog waveform generation or real-time processing.Keep your code simple, comment it, and share. Happy coding!
Update: There is also a significant community using Matlab, which was not mentioned in the original post. My apologies! Matlab provides interface for National Instruments IO boards and other hardware, and there is a popular software package ScanImage for microscope control, written exclusively in Matlab. My personal limited experience with Matlab for instrument control made this slip away from my attention.
This comment has been removed by a blog administrator.
ReplyDelete